

Short answer: When a Unity Manufacturing spotlight won't light, follow Unity's order: reseat the handle, check the fuse, then disconnect the lead wire, remove the handle and put 12 V DC on the rod contact. If the light works, look at the handle or the outer tube. If it doesn't, check the bulb, then the shaft assembly.
Last updated: October 2026 · By SpotlightDepot Team, an authorized Unity Manufacturing dealer · Compiled from the electrical troubleshooting in Unity instruction sheets 420-A Rev. C (2007, step 23), 4392 Rev. G (2002, step 11a) and 3751 Rev. C (2002, step 10A).
These tests end in one of three parts: the handle assembly, the bulb or the spotlight shaft assembly. We stock handles: the Unity U-6701-0101 replacement handle, which our listing shows for heads marked S6, S04, 325-380, H1 and others, and the Unity U-6701-0495 handle, listed as the replacement for 2021–2024 Chevrolet Tahoe factory spotlight handles. If the head itself is finished, there is the Unity 335GM-0002 30W LED spotlight (GM shaft; bracket kit sold separately, per its listing).
What should you check first when a Unity spotlight won't light?
Unity's sheets ask you to read the installation steps first so you understand how the spotlight goes together (420-A steps 12–22 and 25). Then start with the two checks that need no tools beyond a wrench:
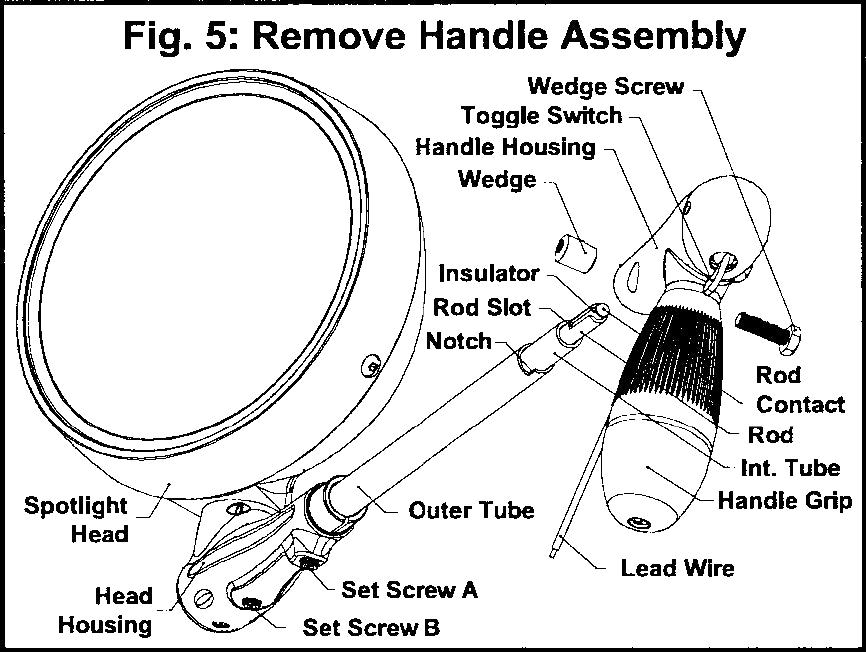
- Reseat the handle. Loosen the wedge screw, push the handle assembly forward onto the shaft and retighten the wedge screw. This restores contact between the switch contact in the handle and the rod contact at the end of the shaft (420-A step 23A). Retighten to the value on your sheet: 60–70 in-lb for a wedge without a flat or 25–35 in-lb for a flat wedge on 420-A (step 18), 65 ± 5 in-lb on 4392 (step 6c) and 3751 (step 7C). All values are in Unity Spotlight Torque Specs.
- Check the fuse. If it has blown, replace it. If the fuse is good, or the light still doesn't work with a new one, go on to the rod-contact test (420-A step 23B, 4392 step 11a-a, 3751 step 10A-a).
How do you test a Unity spotlight at the rod contact?
- Disconnect the lead wire from power first. Unity's sheets say to keep the lead wire disconnected the whole time the handle assembly is being removed or installed.
- Remove the handle assembly (wedge screw and wedge out, handle off the shaft).
- Apply 12 V DC to the rod contact at the end of the shaft. The result tells you which half of the spotlight to look at next (420-A step 23C, 4392 step 11a-b, 3751 step 10A-b).
The light works on 12 V: is it the handle or the outer tube?
If the light comes on with 12 V DC at the rod contact, power reaches the bulb through the shaft, so Unity's sheets look at the handle side next. Sheet 420-A step 23C continues:
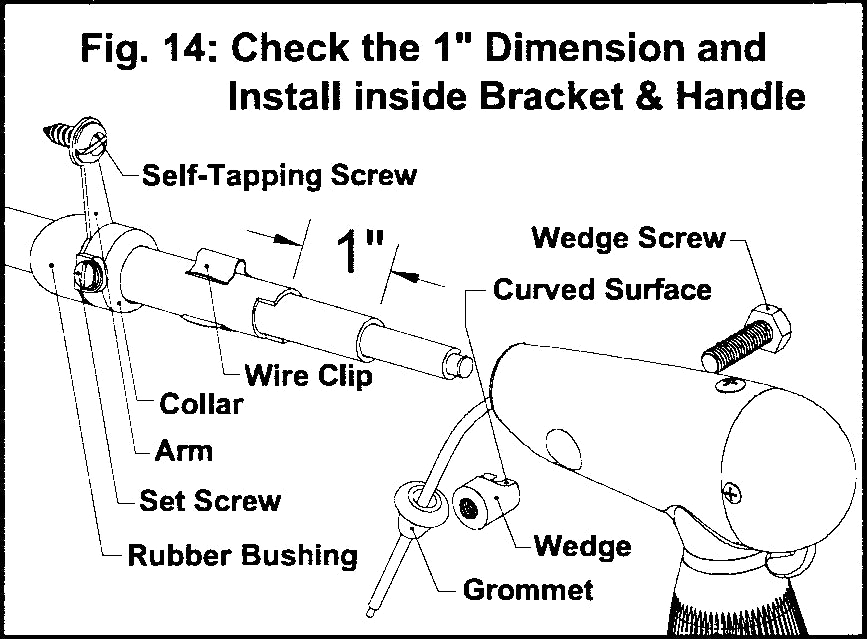
- Check the 1-inch dimension. Measure how much intermediate tube is exposed past the end of the outer tube. If it is at least 1 inch, replace the handle assembly. If it is less than 1 inch, go to step b.
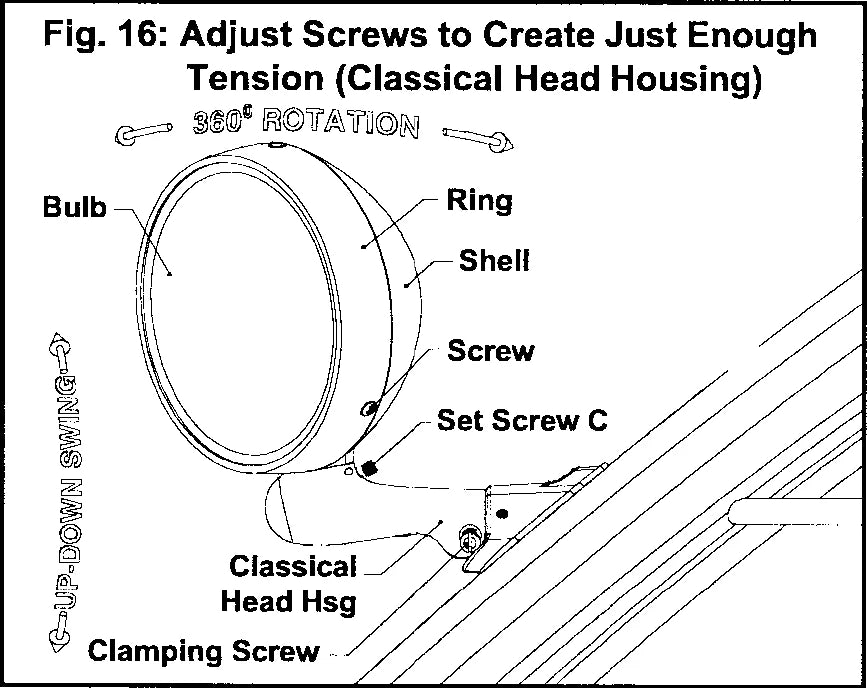
- Reposition the outer tube. Loosen the bracket clamping screw or set screw and the up-down set screw on the head housing (Set Screw A on this sheet). Remove the spotlight assembly and outer tube, seat the outer tube fully into the head housing (420-A step 12), reinstall and test. If the nylon bushing comes out of the head housing, line its key up with the keyway before reseating it (420-A step 12, Fig. 6). On a classical head housing, the clamping screw does Set Screw A's job (420-A step 25). If the light still doesn't work, replace the handle assembly.
Sheets 4392 and 3751 skip the 1-inch check in their troubleshooting: if the light works at the rod contact, they go straight to a new handle assembly. Both still require at least 1 inch at installation (4392 step 5g, 3751 step 6B), so measure it before you buy a handle.
The light doesn't work on 12 V: is it the bulb or the shaft?
If the light stays off with 12 V DC at the rod contact, the fault is in the head or the shaft. All three sheets give the same order (420-A step 23C-c and d, 4392 step 11a-b, 3751 step 10A-b):
- Check the bulb. Open the spotlight head, disconnect the bulb wires and test the bulb directly with a 12 V DC source. If the bulb lights, replace the spotlight shaft assembly. If it doesn't, go to step d.
- Replace the bulb and test again with 12 V DC at the rod contact. If the light still doesn't work, replace the spotlight shaft assembly. If it works, reinstall the handle and test; on sheet 420-A, check the 1-inch dimension first and reposition the outer tube if it is short. If the light still fails with the handle on, replace the handle assembly.
Whenever the handle goes back on, keep the lead wire disconnected until it's in place, bring the grip to its parking position (about 9 o'clock on a left-hand spotlight, 3 o'clock on a right-hand one) with the handle housing key against one side of the notch, and keep pressure on the handle so the switch contact stays on the rod contact while you insert the wedge and wedge screw (420-A steps 18 and 23C).
Unity's sheets describe heads with a replaceable bulb. If your spotlight is an LED model, ask us before you open the head. Which bulb each Unity series takes is covered in Which Bulb Does My Unity Spotlight Take?
How do Unity's three troubleshooting sheets differ?
| Check | 420-A Rev. C (2007), step 23 | 4392 Rev. G (2002), step 11a | 3751 Rev. C (2002), step 10A |
|---|---|---|---|
| Reseat handle (wedge screw) for contact | Yes, first | No | No |
| Fuse | Yes | Yes, first | Yes, first |
| 12 V DC at the rod contact | Yes | Yes (rod contact H) | Yes (rod contact W) |
| 1-inch dimension and outer-tube reposition | Yes | Not in troubleshooting (required at installation, step 5g) | Not in troubleshooting (required at installation, step 6B) |
| Bulb test, then bulb replacement | Yes | Yes | Yes |
Which part do you need?
| Where the test ended | Part | Where to get it |
|---|---|---|
| Light works at the rod contact, 1 inch or more of intermediate tube showing | Handle assembly | Our Unity replacement handles, e.g. U-6701-0101 (series-specific, per its listing) or U-6701-0495 (2021–2024 Tahoe factory handles, per its listing). Match your head marking or vehicle on the product page. |
| Light works at the rod contact, less than 1 inch showing | No part yet | Reposition the outer tube first; replace the handle only if it still fails (420-A step 23C-b) |
| Bulb lights on its own, but not at the rod contact | Spotlight shaft assembly | Not listed on the site: ask a question with your spotlight's part number |
| New bulb fitted, still dark at the rod contact | Spotlight shaft assembly | Ask a question with your spotlight's part number (420-A step 23C-d) |
| Bulb doesn't light on its own | Bulb | Which bulb your series takes; ask us for the part |
| Fuse blown | Fuse | Replace with the same rating as the original; Unity's sheets don't list one |
Frequently asked questions
Why won't my Unity spotlight turn on?
Start with the handle: loosen the wedge screw, push the handle forward and retighten it so the switch contact meets the rod contact. Then check the fuse. If both are fine, remove the handle with the lead wire disconnected and test with 12 V DC at the rod contact (Unity sheet 420-A step 23).
How do you test a spotlight without the handle?
Disconnect the lead wire from power, remove the handle assembly and apply 12 V DC to the rod contact at the end of the shaft. If the light works, Unity's sheets point to the handle side; if it doesn't, check the bulb and then the shaft assembly.
What is the 1-inch dimension on a Unity spotlight?
It is how much intermediate tube shows past the end of the outer tube. Unity sheet 420-A requires at least 1 inch so the rod contact reaches the switch contact in the handle. If it is shorter, seat the outer tube fully into the head housing.
How do I know if it's the bulb or the handle?
Test with 12 V DC at the rod contact with the handle off. Unity's sheets treat light on as pointing to the handle or the outer-tube position, and light off as a reason to test the bulb directly; a good bulb then points to the shaft assembly.
What fuse does a Unity spotlight use?
Unity's installation sheets don't list a fuse rating. Replace a blown fuse with one of the same rating as the original, and if the new fuse blows too, have the wiring checked before going further.
Next step
Need a handle? See the U-6701-0101 and our other Unity replacement handles. Installing from scratch? Follow How to Install a Unity Pillar-Mount Spotlight and the values in Unity Spotlight Torque Specs. Not sure what you have? Ask a question; fleets can request a quote.


