

Short answer: A Unity Manufacturing pillar-mount (post-mount) spotlight passes through a 1/2-inch hole in the vehicle's A-pillar and is held by a vehicle-specific bracket kit. You position the bracket with the kit's paper template, drill through a drill bushing, feed the spotlight shaft through the bracket, set the notch and parking position, install the handle, and connect the lead wire to a fused 12-volt source.
Last updated: October 2026 · By SpotlightDepot Team · Based on Unity Mfg. Co. instruction sheets 420-A (Rev. C) and 4392 (Rev. G). Always follow the sheet and template packed with your bracket kit: vehicle-specific sheets can list different values.
SpotlightDepot is an authorized Unity Manufacturing dealer. This guide is written from Unity's own dealer instruction sheets and from the kits we ship; where a value is vehicle-specific we say so rather than averaging it.
Before you start
- Get the right bracket kit for your vehicle. Unity bracket kits are vehicle-specific, and each kit pairs with a spotlight of a set shaft length. The length is coded by letters such as GM, V or A, which you'll see in Unity part numbers like 325GM or 330V. Look up your year, make and model in Find Your Fit before you order. Our guide Will a Crown Victoria Spotlight Fit a Tahoe? explains how shaft codes work. Kits by vehicle: Which Unity Installation Kit Fits My Vehicle?
- Find the template sheet. Post-mount bracket kits come with a paper pattern that marks the mounting holes and the shaft hole for that vehicle. (Vehicles with a factory spotlight prep package may already be drilled.) Make sure you have the pattern for your exact vehicle before you cut it out.
- Plan for a clear drill path. The 1/2-inch hole goes through the pillar, and wiring harnesses or side-curtain airbags can sit behind the trim. You will check the path before drilling. If the bracket doesn't fit, or something in the path can't be moved aside, stop and ask us before going further.
- Prepare the vehicle. Read the whole sheet that came with your kit first. Park on level ground, disconnect the battery and wear safety glasses throughout the job.
Inside-pillar installs follow a different sheet. If your kit uses Unity's inside "A" pillar procedure (sheet 4392), follow that sheet step by step instead of Part 1 below. The main differences: the pattern goes on the inside of the pillar; you close the door and drill from inside through the pillar and the outer door frame; you drill the garnish trim from outside using the pillar hole as a guide; you cut a notch in the door frame with the door-notch pattern and cover it with edge guard; and you seal the shaft hole with RTV silicone. Your kit's sheet tells you which method applies to your vehicle.
Tools you'll need
| Tool | What it's for |
|---|---|
| Scissors and masking tape | Cutting out the template and taping it to the pillar |
| Center punch and hammer | Marking the mounting-hole centers |
| Drill with 1/8", 5/16" and 1/2" bits | 1/8": pilot holes for the bracket screws · 1/2": spotlight shaft hole · 5/16": lead-wire grommet hole, if needed |
| Flashlight | Checking behind the trim and the outer skin for wires and airbags |
| Screwdrivers and pliers | Trim, mounting screws, pulling out the (hot) drill bushing |
| Allen (hex) wrenches | Set screws on the head housing and bracket |
| 3/8" box wrench | The wedge screw that locks the handle |
| Torque wrench (inch-pounds) | Bracket and wedge screws (values in the table below) |
| Wire stripper, crimper, inline fuse holder, ring terminal | Connecting the lead wire to fused power |
Know the parts before you start
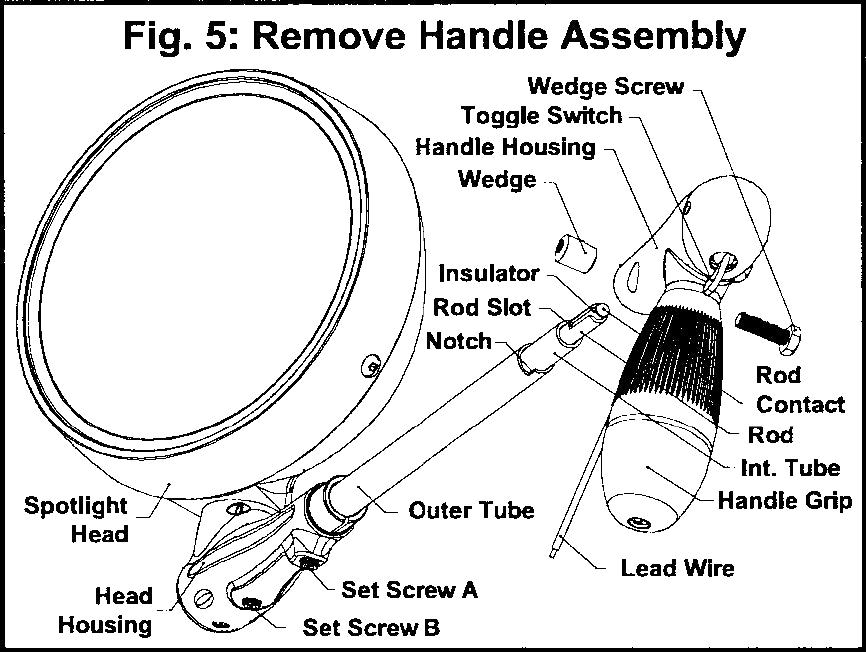
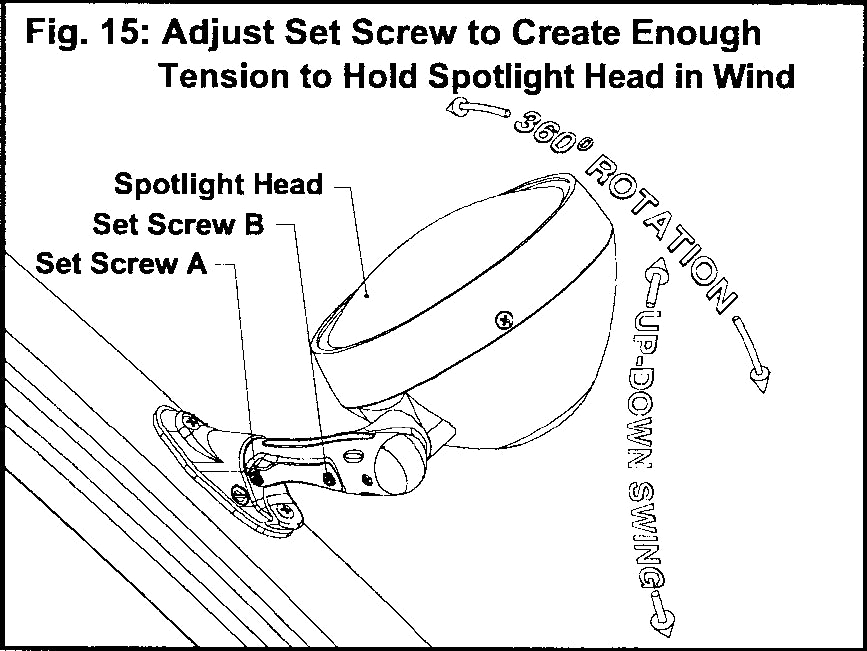
The steps below refer to a handful of parts by name. The head housing at the base of the lamp holds two set screws. The up-down set screw sets the tension for the up-and-down swing and also holds the outer tube in the housing; the rotation set screw sets the tension for 360° rotation. Sheet 420-A calls them Set Screw A and Set Screw B, but the letters change from sheet to sheet (the Ford Explorer sheet 8546 swaps them, and sheet 4392 uses T and S), so identify each screw by what it does. On the older classical head housing, a clamping screw and Set Screw C do the same two jobs. The shaft is an outer tube with an intermediate tube and a rod inside it. The rod contact at the inner end of the shaft meets the switch contact in the handle, and that is how power reaches the lamp. The handle assembly slides onto the inside end of the shaft and locks on with a wedge and wedge screw; its toggle switch turns the light on and off.
Step-by-step installation
Part 1: Mount the bracket
- Confirm the kit and cut the pattern. Double-check that the bracket kit and the spotlight's shaft length are the ones listed for your vehicle, then cut the correct pattern out of the template sheet.
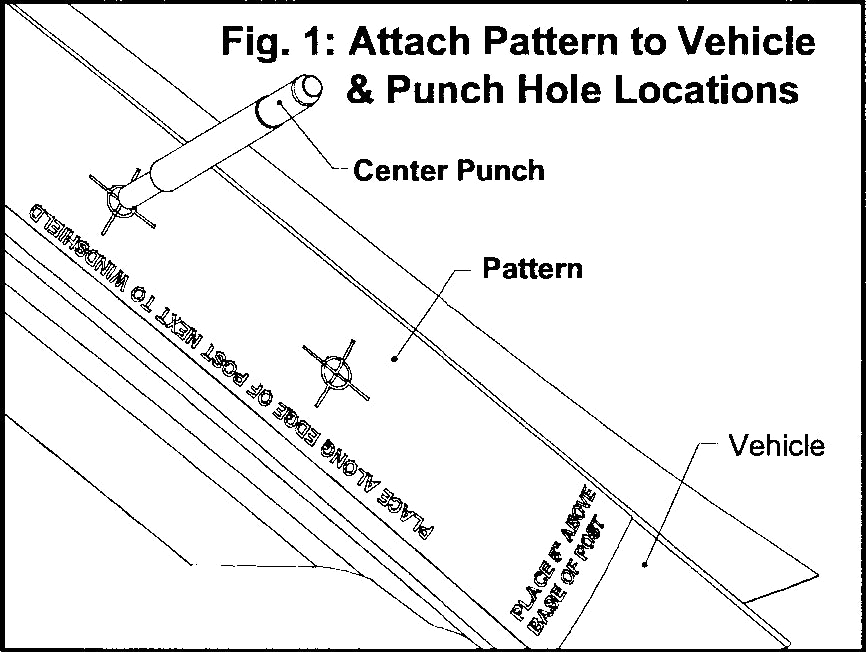
- Tape the pattern to the pillar. Line it up using the locating points, lines or curves printed on it. Some patterns are marked as an illustration only; for those, follow the written instructions on the pattern. Lay the bracket over the pattern to confirm it fits.
- Check the drill path. On a post installation, remove the garnish trim from inside the A-pillar and confirm that no wires, cables or side airbags sit where the 1/2-inch shaft hole will go. Reinstall the trim once you're sure. If the path can't be cleared, don't drill.
- Punch and drill the mounting holes. Center-punch each mounting-screw location, remove the pattern and drill 1/8-inch pilot holes for the self-tapping screws, unless your sheet gives another size (the Ford Explorer sheet 8546 uses 5/32 inch). If the screws are very hard to drive, Unity's inside-pillar sheet (4392) allows opening 1/8-inch holes up to 9/64 inch. The right size depends on the pillar's material and thickness; never drill oversize.
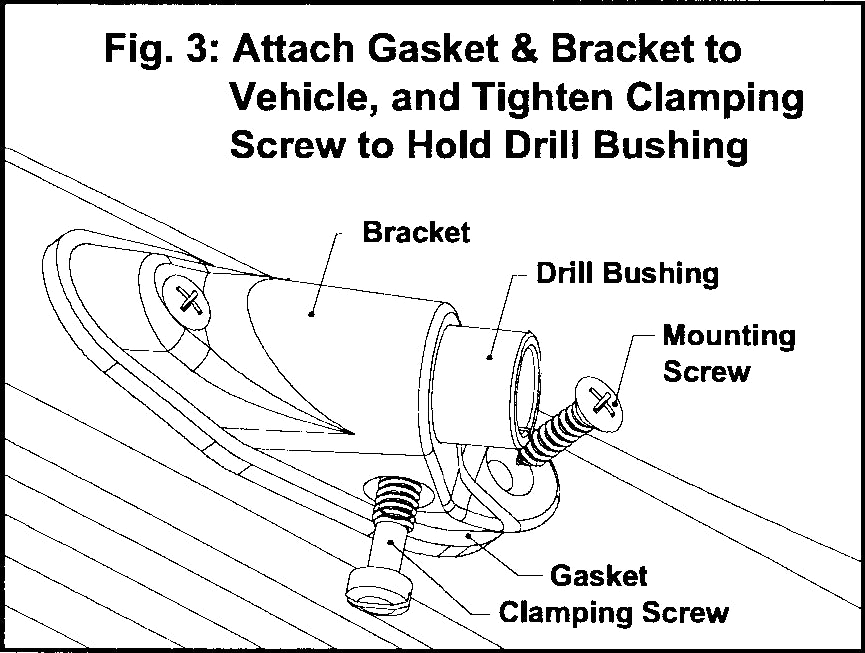
- Mount the bracket and drill bushing. Fasten the bracket and its gasket with the mounting screws. Slide the drill bushing into the bracket and tighten the clamping screw (or set screw) so it can't move. Unity uses two bushing styles: a 1-inch-long bushing with a split and a 1/2-inch-long bushing with a flat.
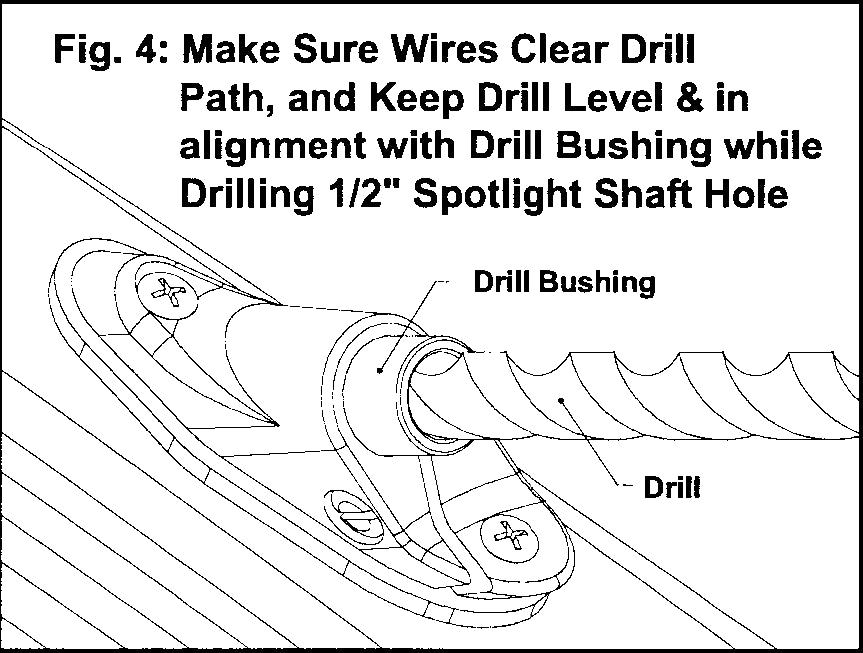
- Drill the 1/2-inch shaft hole. Drill through the outer skin first, then use a flashlight to confirm no wires or cables are in the way before continuing through the body. Keep the drill level and lined up with the bushing the whole way, and let the bit do the work. Check from time to time that the bracket mounting screws are still tight.
- Remove the drill bushing. Loosen the clamping screw and pull the bushing out with pliers. It will be hot.
Part 2: Install the spotlight
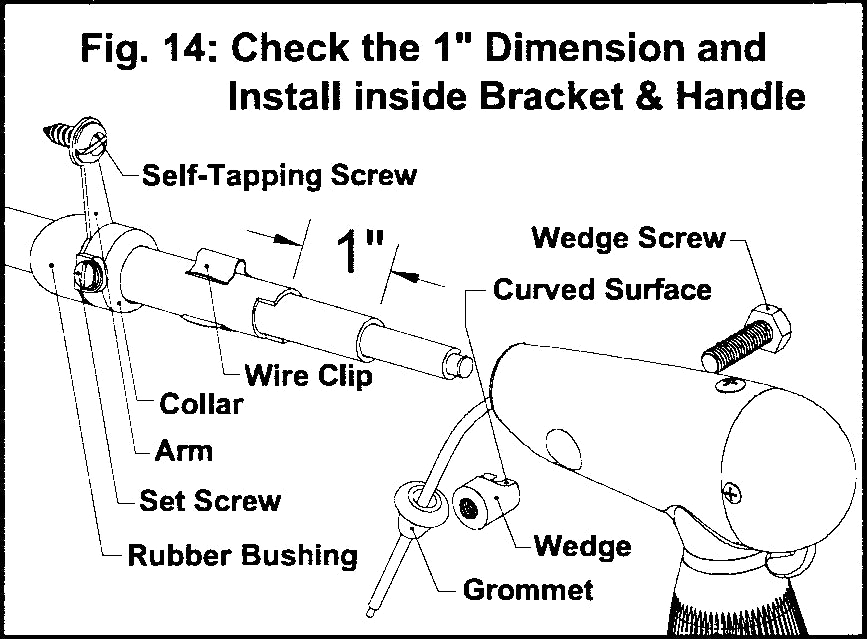
- Take the handle off and check the 1-inch dimension. Remove the wedge screw and wedge, then slide the handle assembly off the shaft. Measure how far the intermediate tube sticks out past the end of the outer tube: it must be at least 1 inch, or the rod contact won't reach the switch contact. If it's shorter, loosen the up-down set screw and push the outer tube fully into the head housing. If the nylon bushing comes out of the head housing, line up its key with the keyway inside the housing as you push it back in; otherwise the outer tube won't seat.
- Feed the shaft through the bracket. Slide it in gently so you don't disturb the rod contact and insulator at its end.
-
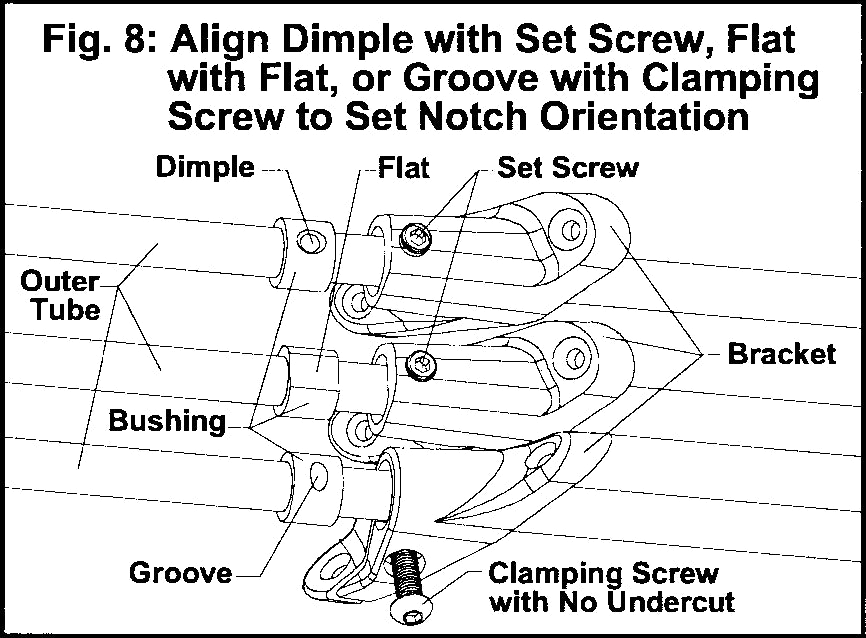
Set the notch orientation of the outer tube. Look at the bushing on the outer tube:
- If it has a flat, a dimple or a groove, seat it in the bracket so the flat meets the bracket's flat, the dimple lines up with the set screw, or the groove lines up with the clamping screw (the style without an undercut). Tighten the set screw or clamping screw to 50 ± 5 in-lb.
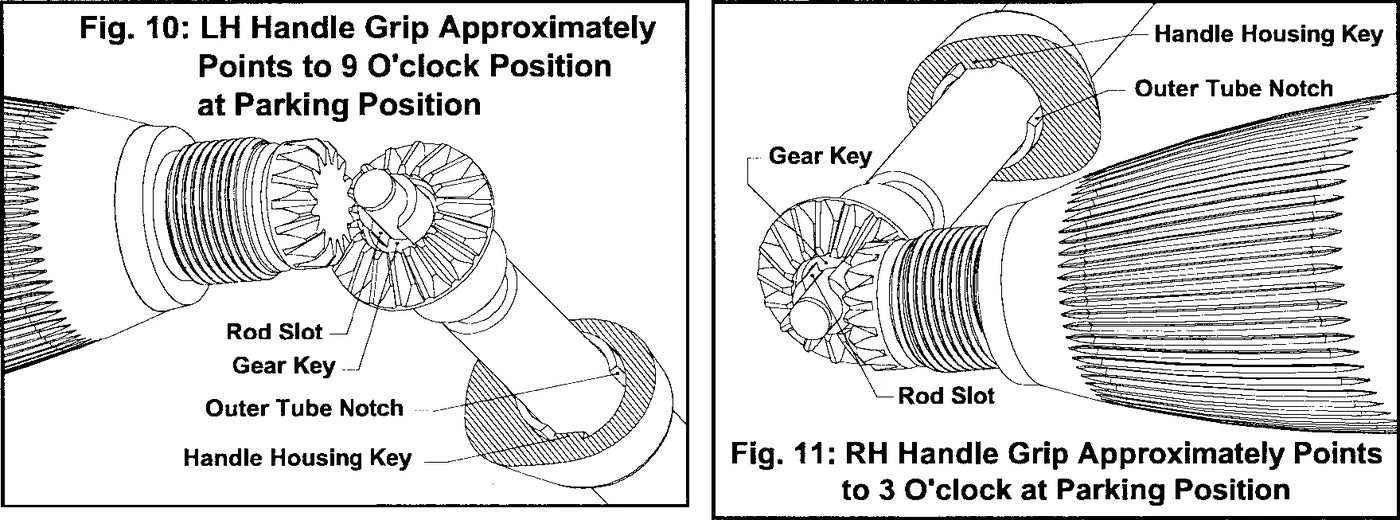
- If it has none of these, turn the bushing so its slot lines up with the slot in the bracket (or sits at a right angle to the set screw), seat it fully and rest the head against the vehicle. Loosen the up-down set screw so the outer tube turns freely in the head housing, then snug the bracket screw just enough to hold the tube. Slide the handle onto the shaft, turning the grip so the gear key engages the rod slot and the handle housing key engages the outer tube notch. Now rotate the outer tube with the handle until three things are true: the grip points to about 9 o'clock on a left-hand (driver-side) install or 3 o'clock on a right-hand install, with the handle housing key touching one side of the notch; the handle housing can turn away from that side (counterclockwise on LH, clockwise on RH) without turning the outer tube; and there is about 1 inch between the grip and the vehicle. Remove the handle and tighten the bracket clamping screw or set screw to 60–70 in-lb.
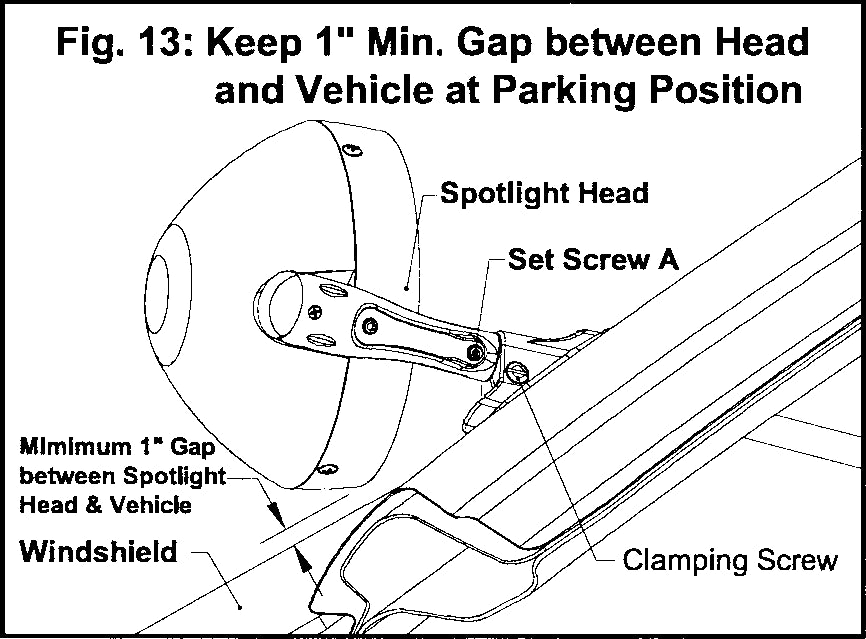
- Set the parking position of the head. If the intermediate tube has a flat, the parking position sets itself when you install the handle and the flat on the wedge meets the flat on the tube. If it doesn't, rotate the head toward the windshield, leaving at least 1 inch between the outer edge of the head and the vehicle, and tighten the up-down set screw to hold it there.
- Recheck the 1-inch dimension, then fit the inside parts. Make sure the outer tube hasn't slipped out of the head housing during the last steps. Slide the rubber bushing, the arm (if your kit has one) and the collar onto the shaft, push them against the vehicle and tighten the collar's set screw. If you use the arm, bend it to fit and fasten it with a self-tapping screw.
- Install the handle. Slide the handle on again and bring the grip to the parking position (about 9 o'clock LH, 3 o'clock RH) with the handle housing key against one side of the notch. Keep pressure on the handle so the switch contact stays against the rod contact while you insert the wedge and wedge screw. Torque the wedge screw to the value on your sheet. Sheet 420-A gives 60–70 in-lb for a wedge without a flat and 25–35 in-lb for a wedge with a flat; other sheets list different values (see the table below).
Part 3: Wire the spotlight
- Secure the lead wire. Clip the lead wire to the outer tube with the wire clip, or use a wire tie.
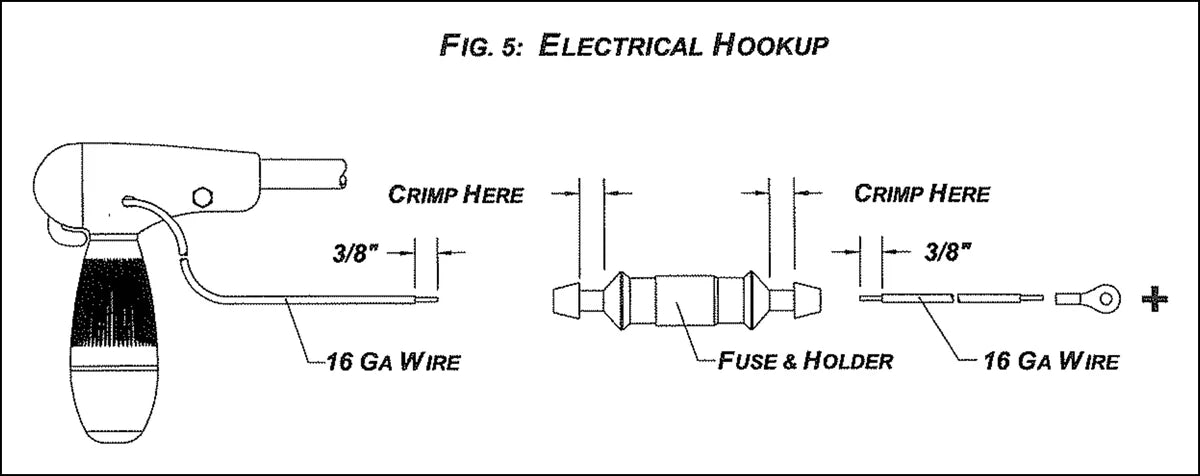
- Connect it to fused power. Run the lead wire to a fused 12-volt source such as the fuse panel or the ignition switch. If you need a new pass-through, drill a 5/16-inch hole and fit the grommet on the lead wire. Unity's inside-pillar sheet (4392) shows one way to do it: strip 3/8 inch of insulation from the spotlight lead and from the extra wire, crimp both into an inline fuse holder, cut the wire to length at the fuse box, crimp on a ring terminal and connect it to the positive (+) terminal. The sheet specifies 16-gauge wire. It doesn't list a fuse rating, so check the instructions packed with your spotlight or ask us before you connect it.
Part 4: Seal, adjust and test
- Seal the shaft hole if your install calls for it. On an inside "A" pillar installation (sheet 4392), seal around the outer tube from outside the vehicle with RTV silicone so water can't get into the pillar. Then press the door weather seal back on. The seal may need a small notch to clear the shaft; close the door to see where to cut it.
- Adjust the tension. Turn the up-down set screw and the rotation set screw until the head holds its aim in the wind but still moves easily with the handle. Overtightening makes the light hard to aim and wears the parts early.
- Check clearances. The head must clear the windshield and the door when it's open, and the grip must clear the dashboard and side window. If the head touches the vehicle, redo the parking position (step 11). If the grip touches, redo the notch orientation (step 10).
- Reconnect the battery and test. Switch the light on and off with the toggle, swing the head up and down with the handle, and turn the grip to rotate the head a full 360° in both directions.
Torque specs and key dimensions
| Item | Spec | Unity sheet |
|---|---|---|
| Bracket set screw or clamping screw, bushing with a flat, dimple or groove | 50 ± 5 in-lb | 420-A |
| Bracket clamping screw or set screw, final (bushing without a flat, dimple or groove) | 60–70 in-lb | 420-A |
| Wedge screw, wedge without a flat | 60–70 in-lb | 420-A |
| Wedge screw, wedge with a flat | 25–35 in-lb | 420-A |
| Wedge screw (wedge with a flat), inside "A" pillar and Crown Victoria sheets | 65 ± 5 in-lb | 4392, 3751 |
| Wedge screw, Ford Explorer sheet | 40 ± 5 in-lb | 8546 |
| Spotlight shaft hole | 1/2 in. | 420-A, 4392 |
| Bracket pilot holes | 1/8 in.; up to 9/64 in. if the screws are too tight (4392); 5/32 in. on the Ford Explorer (8546). Never oversize. | 420-A, 4392, 8546 |
| Lead-wire grommet hole | 5/16 in. | 420-A |
| Intermediate tube showing past the outer tube | At least 1 in. | 420-A |
| Head to vehicle at parking position | At least 1 in. | 420-A |
| Grip to vehicle at parking position | About 1 in. | 420-A |
| Lead wire | 16 gauge, 3/8 in. stripped, inline fuse holder | 4392 |
The sheets differ because handles, wedges and brackets differ between models. The Ford Explorer sheet (8546) also lists 50 ± 5 in-lb for the bracket set screw, and the Crown Victoria sheet (3751) calls for about 1-3/8 inches between the head and the windshield on cars with the DSO prep package. Use the numbers on the sheet that came with your kit. If you don't have it, ask us before you tighten anything.
Every Unity torque value, with N·m conversions and the flat vs curved wedge difference, is in Unity Spotlight Torque Specs: Every Screw in One Table.
Common mistakes
- Drilling before checking behind the trim. Wiring and side airbags can sit in the path of the shaft hole.
- Oversize pilot holes. The self-tapping screws lose their grip. Drill the size on your sheet and open holes only as far as it allows.
- Less than 1 inch of intermediate tube showing. The rod contact can't reach the switch contact, so the light won't come on.
- A misaligned nylon bushing. If its key isn't in the keyway, the outer tube won't seat in the head housing.
- Overtightened set screws. The head becomes hard to aim and wears early. Set just enough tension to hold aim in the wind.
- Working on the handle with the lead wire live. Unity's troubleshooting steps say to keep the lead wire disconnected from power whenever you remove or install the handle assembly.
What to order
| Part | What to check | Where to find it |
|---|---|---|
| Bracket (installation) kit | Matches your vehicle's year and body; includes the template and the LH or RH bracket | Find Your Fit or your vehicle's page below |
| Unity spotlight | Shaft code (GM, V, A and so on) matches the kit | Unity spotlights |
| Replacement handle, wedge bushing kit | For repairs, or a pillar that was drilled before | Accessories |
Vehicle pages: Ford Police Interceptor Utility · Ford Crown Victoria · Ford F-150 / F-250 · Ford Expedition · Chevrolet Tahoe · Chevrolet Suburban · Chevrolet Silverado · Chevrolet Impala · GMC Yukon · GMC Sierra · Dodge Charger · Dodge Durango · Heavy trucks
Which Unity bracket kit fits my vehicle?
The spotlight itself is near-universal; the bracket kit is what makes it vehicle-specific. The kit number is stamped on the bracket and printed on the instruction sheet. Below are the kits for the vehicles we are asked about most. Kits ending in RH are the passenger-side version of the same bracket.
| Vehicle | Years | Bracket kit (driver side) | Passenger side |
|---|---|---|---|
| Ford Crown Victoria | 1980–1991 | 184 | 184RH |
| Ford Crown Victoria (door mount) | 1992–2011 | 232* | 232RH* |
| Ford Crown Victoria (inside A-pillar) | 2001–2011 | 5556 | 5557 |
| Ford Explorer | 1991–2001 | 29* | 29RH* |
| Ford Explorer | 2002–2010 | 229 | 229RH* |
| Ford F150 | 2000–2003 | 229 | 229RH* |
| Ford F150 | 2004–2014 | 184 | 184RH |
| Ford F150 | 2015–2017 | 189 | 189RH |
| Ford Expedition | 1997–2002 | 229 | 229RH* |
| Chevrolet Tahoe | 1995–1999 | 229 | 229RH* |
| Chevrolet Tahoe | 2001–2006 | 229 | 229RH* |
| Chevrolet Tahoe (no air curtain) | 2007–2014 | 254 | 254RH* |
| Chevrolet Suburban | 1973–1991 | 27 | 27RH* |
| Chevrolet Suburban | 1992–1999 | 229 | 229RH* |
| Chevrolet Suburban | 2001–2006 | 229 | 229RH* |
| Chevrolet Suburban (no air curtain) | 2007–2014 | 254 | 254RH* |
| Chevrolet Silverado 1500–3500 | 1999–2006 | 229 | 229RH* |
| Chevrolet Silverado (no air curtain) | 2007–2013 | 254 | 254RH* |
| Chevrolet Impala | 1979–1985 | 223 | 223RH* |
| Chevrolet Caprice | 1979–1990 | 223 | 223RH* |
| Chevrolet Caprice | 1991–1994 | 229 | 229RH* |
| GMC Yukon | 1992–1999 | 229 | 229RH* |
| GMC Yukon | 2001–2006 | 229 | 229RH* |
| GMC Yukon (no air curtain) | 2007–2014 | 254 | 254RH* |
| GMC Sierra | 1999–2006 | 229 | 229RH* |
| GMC Sierra (no air curtain) | 2007–2013 | 254 | 254RH* |
| Dodge Durango | 1998–2009 | 229 | 229RH* |
| Dodge Durango | 2011–2017 | 189 | — |
| Dodge Charger | 1971–1974 | 206* | 206RH* |
| Dodge Charger | 1975–1978 | 29* | 29RH* |
| Dodge Charger | 1982–1987 | 208* | 208RH* |
* We do not stock this bracket kit as a catalogue item. We can still source it — request a quote with your year, make and model and we will confirm availability and price.
This is a subset. Our fitment lookup covers 2,505 year-make-model combinations across 97 makes, including heavy trucks and older vehicles not listed here: Find your fit by vehicle.
Note on 2007–2014 GM SUVs and trucks: the body style split between air-curtain and non-air-curtain versions, and they take different brackets. Check the A-pillar for an airbag tag before ordering — the wrong kit will not clear the curtain.
Mounting-style warning: This reference includes door-mount, exterior post-mount and inside A-pillar configurations. They do not all use the same drilling procedure. A bracket number alone is not enough to confirm the correct installation. Before cutting or drilling, verify the manufacturer's vehicle-specific template, mounting location, shaft length, side and airbag clearance. If any detail conflicts, stop and contact us or Unity.
Frequently asked questions
Do I have to drill to install a Unity pillar-mount spotlight?
On most vehicles, yes: a 1/2-inch shaft hole through the A-pillar plus small pilot holes for the bracket screws. Some police-package vehicles leave the factory with the pillar already prepared. See I Bought a PPV Without the Spotlight Option. What Do I Need?
Which way should the spotlight handle point?
At the parking position the grip points to about 9 o'clock on a left-hand (driver-side) spotlight and about 3 o'clock on a right-hand one, with roughly 1 inch between the grip and the vehicle.
How tight should the set screws be?
Just tight enough that the head holds its aim in the wind. One set screw on the head housing controls the up-and-down swing and the other controls 360° rotation; the letters printed for them vary between Unity sheets. Overtightening makes the light hard to aim and wears the parts. If the head still drifts or feels stiff, see Unity Spotlight Won't Hold Its Aim? How to Adjust the Tension Set Screws.
How much clearance does the spotlight need from the windshield?
Unity's universal sheet (420-A) calls for at least 1 inch between the head and the vehicle at the parking position. The Crown Victoria sheet (3751) specifies about 1-3/8 inches from the windshield on cars with the DSO prep package.
My new spotlight doesn't light up. What should I check first?
Work through Unity's troubleshooting order:
- Loosen the wedge screw, push the handle forward and retighten it, so the switch contact meets the rod contact.
- Check the fuse.
- Disconnect the lead wire, remove the handle and apply 12 V DC to the rod contact.
- If the light comes on, check the 1-inch dimension. If at least 1 inch of intermediate tube shows, the handle assembly needs replacing. If less shows, reseat the outer tube in the head housing and test again.
- If the light stays off, check the bulb next.
Which Unity bracket kit fits my vehicle?
Match your exact year, make, model, mounting configuration, side (LH/RH) and required spotlight shaft length. Start with our Find Your Fit lookup, then confirm the vehicle-specific template included with the kit. The table above is a starting point, not a substitute for the latest Unity application information. Ask our team if the vehicle has an air curtain, factory spotlight preparation or a previously drilled pillar.
Official Unity installation documents
This guide summarizes multiple installation procedures. Specifications and torque values can vary by bracket, wedge, shaft and vehicle. Read the instructions and paper template supplied with your exact kit before performing any work. For official source material, see:
- Unity 420-A, Rev. C — standard spotlight and bracket installation (PDF)
- Unity 4392, Rev. G — inside A-pillar installation (PDF)
- Unity 3751, Rev. C — Crown Victoria installation (PDF)
- Unity 8546 — 2011–2017 Ford Explorer/Interceptor installation reference
- Unity's official installation-document library
Next step
Find the bracket kit and spotlight for your vehicle in Find Your Fit. Ordering for a fleet or an agency? Request a Quote. Not sure which kit you need? Ask a question and we'll check it for you.
Shopping for a new spotlight? Browse Unity spotlights after checking your vehicle fitment. Brackets and shaft lengths are vehicle-specific; do not order from a generic compatibility assumption.


