

Short answer: A Unity Manufacturing spotlight holds its aim through two set screws on the head housing, not through the handle. One sets the up-and-down tension, the other the 360° rotation tension. Tighten each just enough to hold the head in the wind. If the head is stiff instead, Unity's troubleshooting moves on to cleaning, greasing or replacing parts.
Last updated: October 2026 · By SpotlightDepot Team, an authorized Unity Manufacturing dealer · Compiled from Unity instruction sheets 420-A Rev. C (2007, steps 19, 24 and 25), 4392 Rev. G (2002, steps 9 and 11), 3751 Rev. C (2002, steps 6, 8 and 10) and 8546 Rev. A (2011, step 12).
If the checks below end in a replacement, we stock the Unity U-6701-0101 replacement handle, which our listing shows for heads marked S6, S04, 325-380, H1 and others, with wedges and screws for both shaft types; the Unity U-6701-0495 handle, listed as the replacement for 2021–2024 Chevrolet Tahoe factory spotlight handles; and, if a wedge or its screw is lost when the handle comes off, the wedge bushing and screw set for flat shafts or the set for round shafts.
Why won't my Unity spotlight hold its aim?
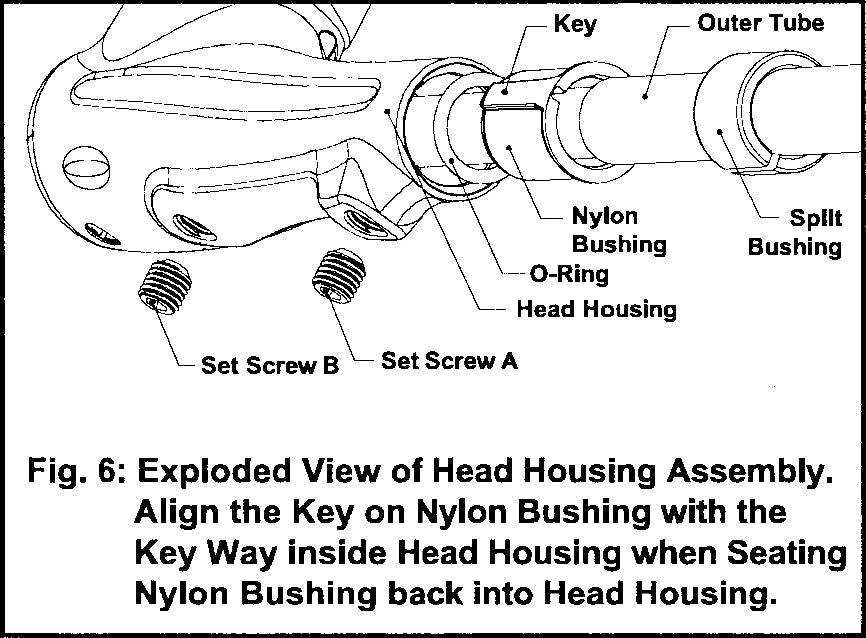
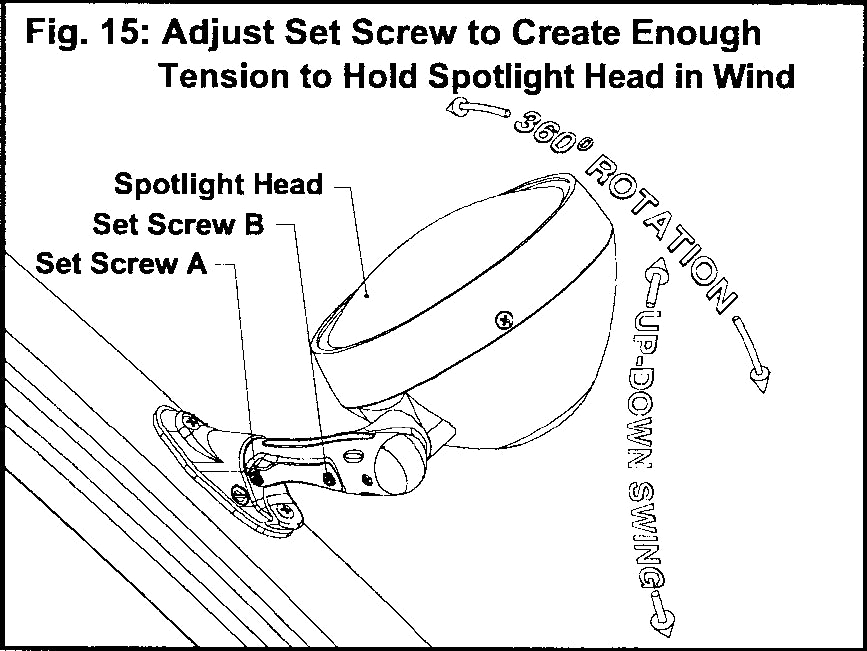
The head is held in position by friction that two set screws on the head housing create. When those screws are too loose, the head droops or swings in the wind; when they are too tight, the light is hard to aim and the parts wear early. Unity's sheets tell you to set them to create just enough tension to hold the head's position in the wind (420-A step 19, 4392 step 9, 3751 step 8, 8546 step 12). The handle carries the switch and turns the head, but it does not set the tension.
Which set screw controls which movement?
The letters printed for the two screws change from sheet to sheet, so go by what each screw does. The up-down screw is the one that clamps the outer tube in the head housing: every sheet has you loosen it to seat or remove the tube (420-A step 12, 4392 step 5b, 3751 step 6B, 8546 step 9d). The other screw controls 360° rotation.
| Unity sheet | Up-down set screw | Rotation set screw | Where the sheet says so |
|---|---|---|---|
| 420-A (universal post mount) | A | B | Step 19, Fig. 15 |
| 4392 (inside "A" pillar) | T | S | Step 9 |
| 3751 (Ford Crown Victoria) | R | P | Step 8 (step 10B's adjustment lines a-i and b-i swap R and P; go by step 8) |
| 8546 (Ford Explorer) | B | A | Step 12 |
| Classical head housing (420-A) | Clamping screw | Set Screw C | Step 25, Fig. 16 |
Letters as printed on each Unity sheet. The Crown Victoria sheet calls for a 1/8" Allen wrench on its up-down screw R (3751 step 4B).
How do you adjust the set screws so the head holds its aim?
- Find the two screws on the head housing at the base of the lamp.
- Set the up-down screw until the head stays where you point it vertically and still swings up and down with the handle.
- Set the rotation screw until the head stays put side to side and still turns a full 360° with the handle grip.
- Test it. Swing the head up and down and rotate it in both directions. It should move smoothly by hand and hold its position in the wind.
- Back off if it's stiff. Unity warns that overtightening makes the spotlight hard to aim and wears its parts early (420-A step 19, 4392 step 9, 3751 step 8, 8546 step 12).
No Unity sheet gives a torque value for these two screws; they are set by feel. (The bracket set screw is a different screw and does have values.) The values that do exist for the bracket and wedge screws are in Unity Spotlight Torque Specs: Every Screw in One Table.
What if the spotlight is stiff or hard to turn?
Unity's mechanical troubleshooting (420-A step 24, 4392 step 11b, 3751 step 10B) splits the problem by direction. Work through it in this order.
Hard to rotate 360° with the handle grip:
- Adjust the rotation set screw and make sure it isn't overtightened. If it's still hard to turn, go on.
- Disconnect the lead wire from power, remove the handle assembly and turn the handle grip 360° in each direction on its own. If the grip doesn't turn smoothly, replace the handle assembly. If it does, the spotlight shaft assembly is the part to replace.
Hard to swing the head up and down:
- Adjust the up-down set screw. If the movement still isn't smooth, go on.
- Disconnect the lead wire from power and remove the handle assembly. Loosen the up-down set screw and pull the spotlight out, leaving the outer tube in place. Clean the dirt off the intermediate tube with penetrating oil, apply white lithium grease evenly along it, and reinstall the spotlight (420-A from step 12, 4392 steps 5–6, 3751 steps 6–8). As you do: if the nylon bushing comes out of the head housing, line its key up with the keyway (420-A step 12, Fig. 6); make sure at least 1 inch of intermediate tube shows past the outer tube, or the wedge flat won't engage (420-A steps 12 and 16, 4392 step 5g, 3751 step 6B, 8546 step 9d); and reset the head's parking position (420-A step 15).
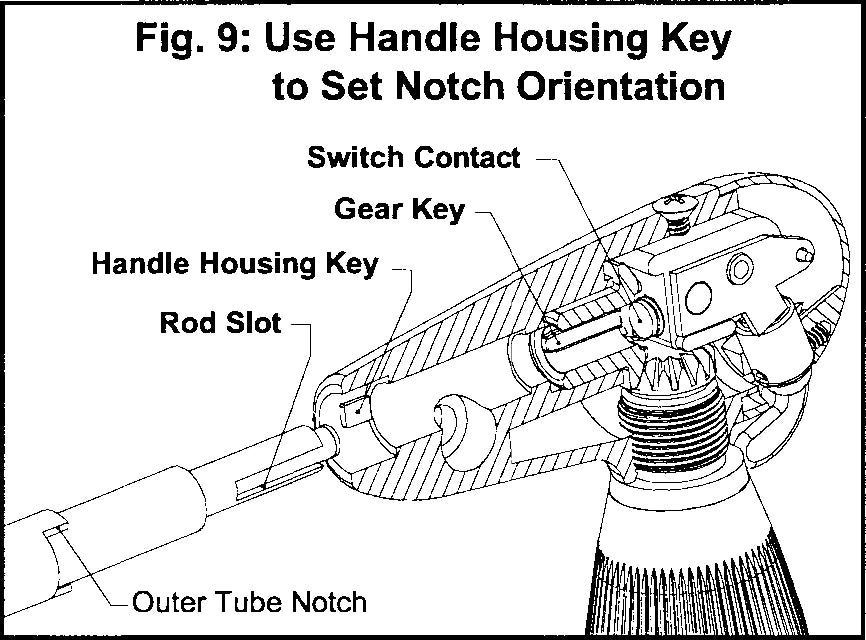
Disconnect the lead wire from power before the handle comes off and keep it disconnected until the handle is back on (420-A step 23C; 4392 step 11a). When you refit the handle, bring the grip to its parking position (about 9 o'clock on a left-hand spotlight, 3 o'clock on a right-hand one) with the handle housing key against one side of the notch, and keep pressure on the handle so the switch contact stays on the rod contact while you insert the wedge and wedge screw (420-A step 18). The full reinstall sequence is in How to Install a Unity Pillar-Mount Spotlight.
What if the spotlight hits the vehicle when you swing it?
Sheet 420-A step 24C covers this case. Disconnect the lead wire from power, remove the handle assembly and check whether the handle housing key is sheared. If it is, replace the handle assembly. If it isn't, reset the notch orientation of the outer tube and the parking position of the head (420-A steps 14 and 15), then reinstall the handle (step 18).
Do you need a new handle?
Usually not for a head that won't hold its aim. Use this table to decide.
| Symptom | First fix | If that doesn't work | Unity sheet |
|---|---|---|---|
| Head droops or moves in the wind | Tighten the up-down and rotation set screws just enough to hold it | The sheets give no further step; ask us | 420-A 19; 4392 9; 3751 8; 8546 12 |
| Hard to rotate 360° | Adjust the rotation set screw | Test the handle off the shaft: replace it with a matching handle if the grip is rough (match your head marking or vehicle on the product page), otherwise the shaft assembly | 420-A 24A; 4392 11b; 3751 10B |
| Hard to swing up and down | Adjust the up-down set screw | Clean the intermediate tube with penetrating oil, apply white lithium grease | 420-A 24B; 4392 11b; 3751 10B |
| Head or handle hits the vehicle | Check the handle housing key | Sheared: replace the handle. Intact: reset the notch orientation and parking position | 420-A 24C |
We don't list Unity spotlight shaft assemblies on the site; complete Unity spotlights by shaft code are in our Unity spotlights collection. If the steps point to a shaft assembly, ask a question with your spotlight's part number.
Frequently asked questions
Why does my Unity spotlight drift down while I'm driving?
Most likely the up-down set screw on the head housing is too loose. Tighten it just enough that the head holds its position in the wind but still swings by hand. Unity gives no torque value for this screw.
Which set screw controls the up-and-down swing on a Unity spotlight?
The one that clamps the outer tube in the head housing. It is Set Screw A on Unity sheet 420-A, B on the Ford Explorer sheet (8546), T on the inside-pillar sheet (4392) and R in the Crown Victoria sheet's installation steps (3751). The other screw controls 360° rotation.
Is a Unity spotlight's aim tension inside the handle?
No. Unity's sheets set the aim tension with the two set screws on the head housing. The handle turns the head and carries the on-off switch; it is replaced as an assembly if its grip won't turn smoothly, its housing key is sheared, or Unity's electrical test points to it.
What grease goes on a Unity spotlight shaft?
White lithium grease, applied evenly on the intermediate tube after cleaning it with penetrating oil, per Unity sheet 420-A step 24B. Disconnect the lead wire and remove the handle first.
When should I replace the spotlight handle?
When the handle grip doesn't turn smoothly with the handle off the shaft, when the handle housing key is sheared (Unity sheet 420-A steps 24A and 24C), or when the lamp lights with 12 V DC applied directly to the rod contact but not with the handle on (420-A step 23C, after checking for at least 1 inch of intermediate tube; 4392 step 11a; 3751 step 10A). A loose, drifting head is usually a set-screw adjustment, not a handle problem.
Next step
Need parts? See the U-6701-0101 handle, the U-6701-0495 Tahoe handle and the rest of our Unity replacement handles. For torque values, see Unity Spotlight Torque Specs. Not sure which handle fits your spotlight? Ask a question; fleet orders can request a quote.
Correction: an earlier version of this guide said the handle was a sealed unit with no external adjustment. Unity's instruction sheets show that the aim tension is set at the head housing; this version follows them.


